__________________________________________________________

About

Portfolio

My Home

Work With Me

Tours

Interviews

Creative Spaces

Style

Thursday, August 6, 2009

Lady in red

Well, it's done. Let us remember and mourn the loss of the orange vinyl with one minutes silence...


And now let's celebrate its new look. Did someone say conga train? I'm in!

I probably should have pulled the fabric down a little on the left side of the back of the chair to make it symmetrical.

I was proud of myself for creating a nice neat fold and straight staple line on the back of the chair. Sewing it would have looked much nicer but I'm not very good with a sewing machine.

It's not hard to do but it is fiddly. I considered covering over the vinyl but it was torn and damaged at the back so I removed it all. Lucky the foam was in good condition underneath. Thank you to all for your advice on how to go about it.


I've yet to finish the second chair. There is only so much time I can buy while my son entertains himself with a wooden spoon.

PS: Not including the cost of my brand new staple gun, this project cost me $9 for 1 metre of fabric.

Wednesday, July 15, 2009

The studio

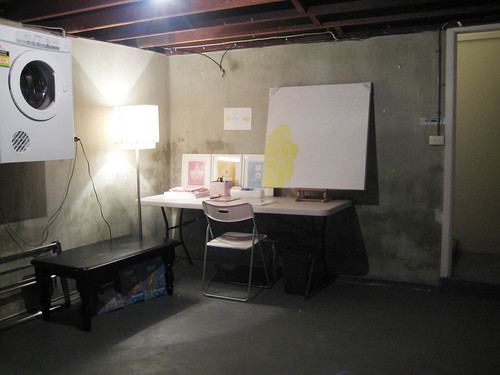
I am finally done playing around with the studio. Before I show you the final photos here is a before shot to compare to:

Mmmm, pretty...

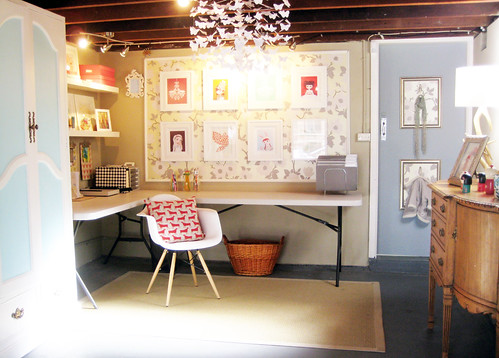
The aim was to create a playful, colourful space I can call my own and one that will inspire me to design. The budget was to spend no more than $900.

Here's how it looks now:

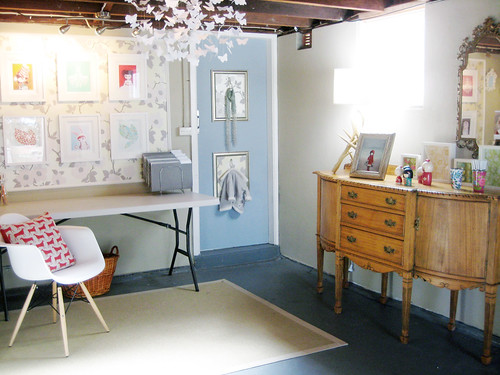
Walls painted, dryer moved, shelves installed and furniture moved in. When I removed the nails in the far wall the concrete crumbled away and left behind huge holes. To hide the mess, my husband and I pasted wallpaper onto a large piece of plywood and mounted it.

The white trestle tables are cheap and functional. I've dressed up the sideboard with a few of my favourite things.

This is where I store everything I need to package and wrap orders. I've lined the drawers with pretty wrapping paper picked up from IKEA for $2.95 a roll.

The start of my kimmidoll and kokeshi doll collection.

I painted an old pine cupboard we owned white and blue and kept the old handles.

The inside of the cupboard has been painted blue too.

Some of the fabrics I use for the designs in my store.

The Alice in Wonderland print set from The Black Apple arrived and I have hung them up along with some of my own work.

So that's it! I love pottering around in here while my son sleeps. What I'm most excited about though is that we've created a space out of a previously unused section of our home.

I already owned most of the items in the studio however I have put together a cost breakdown of the things I did buy (and some that I splurged on):

Paint for cupboard (Dulux Whisper White, Dulux Tapioca 1/2 strength and undercoat) - $80
Graham & Brown wallpaper - $50 delivered
Plywood and moulding for wallpaper frame - $50
IKEA Egeby rug - $149
Clipboards (which I then covered with fabric) - $12
Matt Blatt Eames style chair - $99
Antique sideboard from Ebay (my big splurge) - $405
Adairs paper butterfly mobile - $50
IKEA wrapping paper - $2.95

TOTAL: $897.95 (
just made it in under budget)

I have also listed the price of some of the other items I already owned for reference:

Paint for walls (Dulux Self Destruct) - $80
Paint for floor (White Knight Grey) - $70
Bunnings trestle tables - $59 each
IKEA Lack floating shelves - $49 each
Kikki-k step file and folders - approx. $30 (I can't remember exact original price)
Kikki-k pink cloth boxes - $34.95 each
Herd cushion cover by Skinny laMinx - $25 (USD)


(Click photos above for more information about the room)

Wednesday, June 17, 2009

Before & After: Pink + Pom Poms + Butterflies

I'm still trying to find my steam so in the meantime, here's a little project I came across that makes me smile. I know, I know, you may have seen a million chair makeovers but is there anything prettier than pink + pom poms + butterflies?

Before:
After:

(Photos Flickr user paola+titi and creativity channel)

I'm thinking the pom poms would be a cute way of dressing up chairs for a party and they are easy to make. I made a few large ones for the baby shower. Instructions can be found here if you are interested.

Wednesday, May 13, 2009

What do you get when you cross...


An ugly door.


A cocktail of leftover paint colours mixed together.


Two hooks bought last year because they were pretty but with no clue where to put them.


Two frames with the glass removed and leftover wallpaper inserted.


The result: A pretty and functional place to hang coats, scarfs etc.


Big people can hang their coats in the top frame and the bottom one is reserved for little people.

Wednesday, February 11, 2009

Wallpapered kitchen display cabinet


A few months ago I mentioned I wanted to paper the kitchen display cabinet. One broken champagne glass and a minor finger cut later and it's done!


It is by no means a professional job. I won't even show you closeup shots of the jagged edges. But when the cabinet door is closed and the shelves are dressed you can't see it so I'm happy.

Monday, February 2, 2009

Kitchen Makeover: Before and After

If you would like to see a side-by-side comparison of the various stages of my kitchen renovation, here you go:


Click on the image above to read more. Hope you had a great weekend!

Thursday, January 29, 2009

Kitchen Makeover: Part 2

Yesterday I posted Part 1 of my kitchen renovation. Today I'll show you the end product.

When we bought the house, the kitchen was accessible via a small sliding door adjoining the living room. To make the living and kitchen area appear larger and flow better, we opened up the wall adjoining the two rooms.


Down lights were installed and the cabinets went in. The kitchen is 'L' shaped and quite narrow. We had tall cabinets installed on the left wall and no floating cabinets on the other walls to help open up the area.

I've always loved the look of white kitchens with white bench tops. I choose antique white polyurethane cabinets and matching Caesarstone bench top.


A french style door was fitted which leads out into the garden.


After

Here is the final product!

We decided against a glass splashback and instead opted for these dusty pink brick tiles which have a slight metallic sheen to them. The house is a cottage home and I felt a glass splashback would look too contemporary. Finances played a factor too.

To decorate, two Tord Boontje 'puddles' appliques were hung on either side of the rangehood.


We also had a breakfast bench installed where the wall used to be. Best decision ever made since we use it a lot to eat casual meals or prepare food.

The cabinets were chosen in a dark brown colour for contrast and to provide some continuity with the dark furniture in the living area.


I was thinking of installing floating shelves above the breakfast bench but I could never keep the shelves tidy so I chose to hang a painting there instead.


This is the view towards the garden. The artwork on the wall is by etsy seller jellybeans.


So that's my little kitchen. I hope you like it.

UPDATE! (11.02.09)

I've since wallpapered the kitchen display cabinet. Check out more photos here.

Wednesday, January 28, 2009

Kitchen Makeover: Part 1

This project was completed a little over a year ago but I stumbled across the renovation photos and thought I'd share with you the before and after shots.

Before

The original kitchen was in such a poor state. The laminate cabinets were chipping and lifting off and bits of particle board would fall off all over the items stored within.


We didn't have the budget to re-do the kitchen before renting out the house so we gave the cabinets a few coats of paint and sealed and smoothed over the chipped areas so that it could at least be liveable. Our poor tenants though...


I can't remember what type of paint was used on the cabinets as it's going back a few years but I do remember that it only came in primary colours. So we chose canary yellow which freshened up the kitchen but still looked horrid.


Excuse the unstyled photos. We were in the midst of fixing the place up when these were taken. The television and diet Coke got us through it all.


In 2007 my husband and I decided to move in so we thought we would put in a new kitchen. It had really had its time by then.


We were surprised to find that underneath the laminate flooring were floorboards that matched the rest of the house!


Check out the wallpaper we found on the kitchen wall behind the cabinets. Who knows how many lives this kitchen has had?


Here it is back to its bare bones. Tomorrow I'll show you the end result. Stay tuned!

Monday, October 13, 2008

Before & After: Chair painted

Before photo

I was asked to post progress shots of the chair being painted and here they are. It was so incredibly simple to do.

1. Tools of the trade
- Wet sponge to soak up any spills
- Fine sandpaper
- Dulux white primer
- White Knight white gloss paint
- Flat angled paint brush

2. Sand the varnish back lightly
I'm sure I didn't get all the varnish off because there is so much detail on the frame but I did the best I could! I cleaned off the dust afterwards using the wet sponge.

3. Mask the fabric

I was really careful to cover up the fabric as best as possible. Very little paint ended up on the fabric and you can barely notice it so I'm happy!

4. One coat of primer

This took me 2 hours to do because of all the detail in the woodwork. I was also careful to get into all holes and detail to cover as much as possible. I left the primer to dry overnight.

5. Two coats of glossy white paint
I used the flat angled brush again getting into all the detail and used long brush strokes so it is as neat as possible.

The first coat took me a bit over an hour. It was hard getting down low with my pregnant belly in the way. The second coat took me half and hour because my sister helped me. I waited for the paint to dry overnight between coats.

6. Peel off the tape and VOILA! All done.

See? Told you it was easy.


After photo
I'd love to see other people's projects!


CREATIVE SPACES

DECORATING

DESIGN

INTERVIEWS

STYLE

TOURS

WRITE TO
PO BOX 42220
LUGARNO NSW
AUSTRALIA 2210

viv@ishandchi.com


VIA EMAIL